Mosselen

Zeeland, the most Western province in the Netherlands, is famous for its mussels, specifically the towns of Bruinisse, Tholen, Yrseke, and Zierikzee. The fishing town of Yerseke in Zeeland is the mussel epicenter of northwest Europe; approximately 90 million kilos of mussels a year come from Yrseke alone. The majority of the mussels go straight to buyers in Belgium, where mussels and fries are considered a staple dish, but in the Netherlands we are also known to enjoy a big pot of mussels, especially when spending a day on the coast.
Traditionally, mussels were on the menu when the letter "R" was present in the name of the month, i.e. starting in September, but nowadays they're available as soon as July.  As soon as they're ready for harvesting, advertisements pop up everywhere, and from September until about April you can find these bivalve mollusks on the menu at restaurants, for sale at the fishmongers, and on many a dinner table all over the country. And it sounds odd, but once I see the advertisements, I start craving them. It's one of those typical "gezellig" things to do: get a big pot of steamed mussels on the table, gather some good friends, a bit of wine, a salad, a crispy baguette, a couple of dipping sauces, and get the party started! 

Fresh mussels are not available to all of us, but nowadays it's quite easy to get good quality frozen ones, so look for them in your grocery stores. About a pound per person is enough for dinner, if you serve it with a salad, fries, and bread, otherwise you may consider a pound and a half, two if they're big eaters. I serve mine with a traditional mustard dipping sauce, but you are welcome to bring your own: curry-flavored dipping sauces and herby ones like a yogurt-parsley sauce also go really well. 

Don't eat the ones that don't open up during the cooking process: they're likely to be bad. Also, watch out for broken shell pieces. 

Mussels
4 pounds (approx. 2 kg) fresh or frozen mussels, in shell
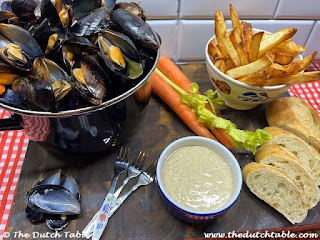
1 cup (250 ml) white wine
1 small onion, peeled and sliced
1/2 carrot, peeled and diced
1 rib celery, diced
2 cloves garlic, peeled and minced
2 bay leaves
5 black peppercorns

Dipping sauce
2 tablespoons mustard
2 tablespoons mayonnaise 
1/2 tablespoon vinegar

Mix into a smooth sauce.

Give the mussels a quick rinse (no need to thaw), and check for "beards": little hairy-looking extensions protruding from the shell. Carefully pull those off, if you find them. 

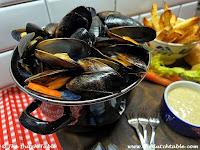
Put the rest of the ingredients in a Dutch oven, or another big pan with a heavy bottom and a lid. Bring to a boil. Lift the lid, add the mussels and boil for seven to eight minutes, tossing the contents of the pan every now and then. The mussels will open up and will be ready to eat.

To serve, place the pan on the table with an extra plate for the shells. Serve with fries, a green salad, and a dipping sauce. Use your fingers to pull the mussels out of the shells or a small fork, and dip into the sauce. 

Smaokelik! (as they say in Zeeland!)


Bruine Bonen met Rijst

Brown beans and rice, or as we say in Holland, bruine bonen met rijst, is a typical dish from Suriname, a former colony of the Netherlands. Here in America, I don't have easy access to the Dutch brown beans, so I use pinto beans instead.

Bruine Bonen met Rijst
1 small piece salt pork
1 small onion, peeled and diced
1 garlic clove, minced
1 tomato, deseeded and chopped
2 cans pinto beans, drained and rinsed
1 cup water
1/4 cup tomato sauce
1 teaspoon ginger
1 teaspoonblack pepper
1/2 beef bouillon cube
1 bay leaf
1/4 cup celery leaves
1 tablespoon sugar
1 cup instant rice
Water

Cut the salt pork in small dice, then fry in a skillet until soft and transparent. Add the onion and the garlic. Stir until soft, then add the tomato. When the tomato has softened as well, add the beans, the water, the tomato sauce, ginger, pepper, the bouillon cube and bay leaf. Bring to a boil, then lower the heat and simmer for about twenty minutes. Taste and adjust (don't add any salt before tasting, the pork tends to be salty enough), add the sugar and the celery leaves, remove the bay leaf and stir everything together. Simmer for another five minutes while you prepare the rice.

Put the rice in a microwaveable bowl, add enough water so that the rice is covered, then microwave on high for two and a half minutes. Let it sit to dry for a minute or two, then stir.

Serve the beans on top of the rice. Nice with some crunchy slices of cucumber.


Hutspot met klapstuk

Yesterday, the city of Leiden celebrated the victory in 1574 over the Spanish invaders. It's an annual celebration during which the Leideners consume large amounts of white bread with herring and even larger amounts of something called hutspot, a colorful mashed potato dish. It's not only eaten on the 3rd of October, but is an extremely popular evening meal during the cold winter days. Hutspot is traditionally served with klapstuk, a piece of braised beef, but sometimes will also be eaten with a typical Dutch meatball. The best carrots to use for this dish are winterpenen, winter carrots such as the Flakkee or Autumn King, a larger and thicker variety of the orange carrot that is harvested shortly after the first frost. The sugars in the carrot add a hint of sweetness to this dish that will appeal to almost any eater, young or old.

The origin of this particular choice of starchy food goes back to a small remainder of stew that was presumably left behind in a large copper pot by the fleeing Spanish army. A young man found the still warm stew and shared it triumphantly with the rest of the starving Leiden-ers. Or at least with those that didn't like herring, I'm sure.

The name of this dish does not sound very appetizing, not even in Dutch. Loosely translated it means "hotchpotch with slap piece". Well, there you go, see what I mean? Who wants to eat that?

But, as is often the case, appearance deceives. In this particular example, the name is not very flattering and quite honestly, neither is the picture. But the taste will convince anyone that there is more to this dish than a silly name.

It is said that the original stew contained parsnips and white beans, and that the meat in the stew was mutton. How it came to be carrots with potatoes and beef.....only history knows. The carrot appeared in Holland for the first time in the 17th century, out of Iran, and was cross-pollinated until it had a bright orange color, to honor the royal family, the Oranges. At that point, the carrot was introduced to the rest of Europe and hey presto! Long live the Queen, and orange carrots for all!

As for the "slap piece": klapstuk is the meat that is cut from the rib. I used slices of beef chuck rib roast and it worked beautifully. The meat is marbled and during its 90 minute braising time will release all kinds of wonderful flavors and most of the fat. You'll love it!

Hutspot met klapstuk
For the meat
1 lb (500 grams) sliced beef chuck rib roast
2 cups (500 ml) water
1/2 beef bouillon cube
1 bay leaf
8 black pepper corns, whole
1 Tablespoon flour, dissolved in 1/2 cup (125 ml) water

Add the water to a Dutch oven or a braising pan, add the bouillon cube and stir until dissolved. Add the beef, the bay leaf and the pepper corns and braise on low heat for approximately 90 minutes or until beef is tender.

Remove the meat to a serving dish, discard the bay leaf and peppercorns and stir the dissolved flour into the pan juices. Stir scraping the bottom of the pan, loosening any meat particles that may be stuck. Bring the heat slowly up until the gravy starts to thicken. Pour the gravy over the meat and set aside, keeping it warm.

For the hutspot
6 large potatoes, peeled and quartered
8 large carrots, peeled and diced
4 large onions, peeled and sliced
2 cups (500 ml) of water
Pinch of salt

Place the peeled and quartered potatoes on the bottom of a Dutch oven. Pour in the water so the potatoes are just covered. Add the pinch of salt. Put the carrots on top, and finish with the onions. Cover and bring to a boil, then lower the heat and boil for about 20 minutes or until the potatoes are cooked. Pour off the cooking water, but save it. Mash the potatoes, carrots and onions until you achieve a mashed potato consistency or leave larger lumps, that's a personal preference. If you need more liquid to make it smoother, add a tablespoon of cooking liquid at a time, or for a richer taste, use warm milk instead. Taste, and adjust with salt and pepper if needed.


Now place a large scoop of hutspot on a warm plate. With the rounded side of a spoon, make an indentation on top of the hutspot, like a pothole. This is the famous "kuiltje". Put a slice of beef on top and pour a tablespoon or two of gravy into the kuiltje, and serve your beautiful, Dutch dish. 

Appelbollen

Those of you that read my other blogs know that, these last several years, I've been picking fruit in local orchards around the valley for most of my cooking and canning. For one, the price you pay for fruits when you pick them is at least fifty to 70% cheaper than in the store. The fruit is also fresh off the tree so it still has all its vitamins and minerals and, on top of that, you support your local farmers. A win-win for all, and it's a fun day out for the family. 
 
Early summer is cherry time, mid summer is peach and plum time, and now that the weather is cooling down a bit, the last of the apples and pears are coming off the tree. Oh joy!! Apples play an important role in the Dutch kitchen: apple sauce is a standard condiment for many potato-based dishes (ever tried French fries with mayo and apple sauce? Don't knock it before you try it, it's the way Dutch children eat their fries) and a key ingredient in potato salad, Hete Bliksem (mashed apples and potatoes) and of course in desserts: Dutch apple pie, apple beignets and the old-fashioned Dutch apple dumpling, the appelbol. Sweet, firm apples in a puff pastry cover and filled with soaked raisins and walnuts.....What a delight! You want a firm apple for this dessert: I used a Golden Delicious, but a Jonagold, Gala or a Braeburn will do just as well. And if you don't have apples? Use a pear!

Probably not a coincidence that these dishes do best in a wintery, cold setting. The appelbol is more often than not a sugary treat with morning coffee, a sweet ending to a long, windy walk along the beach or together with a cup of hot chocolate after ice skating on the canals. Appelbollen are usually served warm and without any additional adornments such as whipped cream, but the last several years people have been adding warm custard or a scoop of vanilla ice cream. It's all good!

Appelbollen
4 medium sized apples
4 tablespoons golden raisins and currants, mixed
1 tablespoon walnut pieces, chopped
1/4 teaspoon cinnamon
3 tablespoon sugar, divided 
4 tablespoons apple juice or rum
4 puff pastry squares (approx. 5 x 5 in.)
2 egg yolks
1 tablespoon water

Preheat the oven to 400F. Wash the apples, and peel and core them. Mix the raisins, walnuts, cinnamon and 1 tablespoon of sugar, and add the apple juice or rum. Set aside and soak for a couple of minutes, then fill each apple with the mixture. If you have boerenjongens, this is a good time to use them! 


Set each apple, top side down, on a square piece of puff pastry and wrap the apple, by pulling up each corner and tucking it slightly into the cored hole. Make sure all sides are covered and clinging to the apple. 

If you have some extra dough left and a couple of cinnamon sticks, you can make stems and leaves and wrap the apple with an additional decorative something or other, but it's not necessary. If you do use cinnamon sticks, make sure to wrap the top with a little aluminum foil, as they tend to burn easily.

Make an egg wash with the yolks and the water, and brush on the dough. Sprinkle all four apples with the remaining sugar. Place each apple in a ramekin or small aluminum pie dish, smooth side up. Bake golden brown in 20-25 minutes.


Oranjekoek

Originally a Frisian wedding delicacy, this treat studded with candied orange peel and spices is a delight to the tastebuds. Nobody quite knows where and how it originated, and why it's called Oranjekoek if the frosting is pink, but who knows.. (oranje means "orange" as in the color, not the fruit.)

The House of Orange-Nassau, the aristocratic dynasty from which our royal family stems, lent the colorful addition to our country's current three colored flag: red, white and blue, with a separate vane in bright orange to show loyalty to the royal family. During international sporting events, you can recognize the Dutch supporters by their orange outfits, wigs and other sports-related items.

But back to the Oranjekoek. The original version is a single layer cookie/cake, frosted with a pink glaze. The dough contains orange peel and whole or ground aniseed (you can also use gestampte muisjes) and nutmeg and is, combined with the sweetness of the glaze, a great addition to your morning coffee or afternoon tea. More recent versions of the cake contain two layers, separated by a filling of almond paste and a swirl of whipped cream on top. I usually bake the single layer pink cake, but in order to celebrate the occasion of Koningsdag on April 27th, I baked the almond paste filled koek, used an orange glaze and added a dollop of whipped cream and some fresh fruit and candied orange peel, for looks.

The koek is originally served in squares and because of its cookie texture is easily picked up by hand and eaten as a cookie, rather than a cake. It will keep great in lunch boxes or cookie jars (without the whipped cream). Because of the cake's slightly dry nature*, it goes well with a glass of milk or a cup of coffee or tea.

Oranjekoek
1 1/2 cup (225 grams) all-purpose flour
1/2 cup (100 grams) sugar
1 tsp nutmeg
2 tsp aniseed (ground or whole)
1/4 cup candied orange peel and/or zest from one medium orange
5 tablespoons (75 grams) butter, cold and cubed
1 medium egg
Ice cold water

For the filling: (best made the day before)
1 cup (250 grams) almond paste
1 egg
1 teaspoon almond extract

For the glaze:
1 cup (125 gram) powdered sugar
1 tablespoon water
Red food coloring for pink, and red and yellow for orange.

For the topping:
1/2 cup (125 ml) whipping cream
1 heaping soup spoon powdered sugar
Fresh berries
Candied orange peel (optional)

Mix the flour and sugar together, then add the butter in small chunks. Keep mixing while you add the nutmeg, aniseed and orange zest, then add the egg. Add a tablespoon at a time of ice cold water to knead into a slightly sticky dough. Fold in the chopped orange peel (optional). Wrap the dough and let it rest in the fridge for about an hour. In the meantime, grind the almonds and the sugar together and fold in a beaten egg. For extra almond taste, add a drop or two of almond extract.

Heat the oven to 350F/175C. Grease an 8 x 8 inch (20 x 20 cm) square baking pan or baking sheet, or line with parchment paper, and divide the dough in two. Pat one part of the dough into the baking pan (allow for about an inch height). Spread the almond paste over the top and pat the second half of the dough on top.

Bake for approximately 25 to 30 minutes or until the cake is done: it will be quite lightly colored. Let it rest in the pan for about five minutes, then turn out and cool upside down on a rack.

When the cake is completely cooled, cover the flat top side with a glaze made of powdered sugar, the food coloring and a little water or milk. If you would rather use natural coloring, try blueberry juice for pink, or carrot juice for orange. Let the glaze dry for at least an hour. Cut into 9 squares, pipe some whipped cream on top and decorate with candied orange peel and fresh berries. You can wear an orange hat if you want to :-)

* sometimes I sprinkle orange liquor over the bottom of the cake (not the one that is going to be glazed) to make it a little moister.


Amazon Prime Shopping Suggestions: 

Disclaimer: if you buy through any of the links in the Amazon Prime Shopping Suggestions section, the Amazon Services LLC Associates Program will pay us a small commission on qualifying purchases. It does not increase your cost or price, and it will help us keep the website running. Your support is very much appreciated! 

Don't have Amazon Prime but want to give it a try? This link offers a 30 day trial.

Stroopwafels

Some things you just don't try at home. It's either too much work, or your palate and mind are so accustomed to a certain (industrialized) flavor that, even if you are willing to go through the trouble of baking yourself, you are never entirely satisfied with the result..... It tastes alright, but it just doesn't have that.... hmmm ....factory-mass-produced-riddled-with-preservatives-kind-of-flavor, you know?

So too, I thought, with the ultra-traditional Dutch stroopwafel. Homemade ones are hard to come by because it's so much easier to grab a packet of ten at the store when you're grocery shopping. But for those of us that grew up in Holland, the sweet perfume of stroopwafels baked fresh at the local market is engrained in our smell-cells. Once a whiff of it hits our nose we follow its lure, much like the Hamelin rats, that leads us to the small waffle cart where a line of salivating children and adults patiently waits their turn. After seeing a waffle cone machine for sale on our local Craigslist I had stroopwafels on my mind........so I purchased the waffle maker, went to work and am pleased to say that the flavor surpasses the factory-made ones! Here is the result!


If you have Dutch friends but have never heard of, or tried stroopwafels, your friends have been holding out on you. Expats jealously guard their stash of stroopwafels, right next to the loot of fruit hail, chocolate flakes and stomped mice. Dutch food is not easy to get a hold off and visitors from abroad will often haul tons of packages of the caramel filled cookies, guaranteeing a warm welcome and a tolerance towards an extended stay.

A stroopwafel is a combination of two cookies and a caramel center. It is said to have originated in the city of Gouda. Since Gouda is also famous for its wonderful cheese, I'll go with that. The Goudese obviously have great taste! The cookies are best when eaten lukewarm, warmed up while resting on the rim of a cup of coffee or tea. Easy to make, stroopwafels will delight everybody in your family, Dutch or not!

Stroopwafels
For the dough
4 1/2 cups AP flour
2 teaspoons of active dry yeast
1 scant teaspoon of ground cinnamon
3/4 cup of white sugar
1/2 cup (1 stick) unsalted butter
1/2 cup of warm water
2 large eggs
pinch of salt

In a kitchen mixer, mix the flour, yeast, cinnamon and sugar and cut in the butter until it resembles small pellets. Slowly pour in the warm water and allow the dough to start coming together, then add the eggs one at a time. Finally add the pinch of salt and knead the dough for a minute or two until it's nice and solid.

Cover and rest for 30 minutes.

For the caramel
1 cup of brown sugar
1 stick of unsalted butter
1 teaspoon of ground cinnamon
5 tablespoons of pancake syrup
1 tablespoon of vanilla extract

Melt the sugar and the butter, stirring slowly over a low heat. Add the cinnamon and the pancake syrup and continue to stir until the caramel comes together and slowly bubbles. Keep stirring because at this stage it's easy to burn! Make sure all the sugar has dissolved and your caramel is nice and creamy (Do not try to lick it from the spoon because you'll burn your tongue!) then add the vanilla extract and blend it in. Keep the caramel warm.

Divide the dough into 20 equal pieces. It's easiest to weigh the total dough and divide by 20, the pieces should come out at approximately 50 grams each. Roll them into small marbles and cover with a damp cloth, you don't want them to dry out while you're baking!

Heat your waffle cone machine or your pizzelle iron according to instructions. Place one dough ball in the middle, press down the top lid and bake each waffle for approximately 40 seconds. Check to see if it's browned nicely and a little puffed up, remove it from the machine and place it on a flat surface.

Now you have to work fast. As long as the waffle cookie is hot, it's pliable. The moment it cools, it will break on you so make sure you have all the items you need within reach.

Place your hand on top of the cookie and slice it horizontally in two. (If it's too hot, use a pot holder). Since the yeast made the cookie puff up a little bit, this should be easy to do with a sharp, non-serrated knife. Place a generous size dollop of gooey caramel on top of the bottom cookie, replace the top part and gently push down on it so that the caramel spreads. Pick up carefully and put on a rack to cool off, and put the next dough ball in the waffle maker. You'll soon get the hang of it!

Many will cut the edges off the cookie so that it is a uniform and nice round shape. I'm not that particular for home use so I just left them as it was, but did cut some into flowers to have with my afternoon coffee.


Krentenbollen for Queen's Day!

Hip hip hurray, it's Queen's Day! In Holland, every April 30th we celebrate old queen Juliana's birthday, with lots of flea markets, orange pastries and, for those so inclined, lots of beer. I haven't celebrated this yearly holiday for over 10 years and only remember it because it's also my brother Lucas's birthday.

But I did want to do something festive and Dutch and even if it wasn't an orange pastry, I did want it to have at least an orange tint to it. Lien from Notitie van Lien baked wonderful krentenbollen, or raisin buns, for BBD#28 last month and I was dying to try them.

I remember eating krentenbollen as a child. I was not particularly fond of them at the time, but would eat them anyway: my love for all things bread would always win. The raisins made the bread feel moist and gooey and every now and then you'd hit a bitter, burnt raisin. My mom would pack one with butter for school or we'd get them on Sundays as a special treat for breakfast.

After I moved away from Holland, it was never a food that I craved but it's so typically Dutch that I feel the need to bake them for this Queen's Day. And now that I bake them myself, I am happy to say that I have come to love these sweet, savory rolls. They are delicious with just a smear of butter, or with a nice sharp cheese.

So put on your tiaras, wear something orange and let's bake!

Krentenbollen
3.5 cups flour (or 500 gram)
1 tsp salt
3 tsp dry instant yeast
1 cup milk, luke warm
1 egg
1/4 cup sugar
3 tablespoons soft butter
1/2 tsp orange zest
1/2 tsp lemon zest
2 cups of dark raisins
1 cup of currants*
1/4 cup of chopped dried apple

1 medium egg, whisked (to glaze)

Mix the flour with the salt, and sprinkle the yeast on the warm milk. While you wait for the yeast to proof, zest the orange and the lemone. Now add the milk to the flour and stir it to get a straggly dough. Keep stirring and add in the egg, the sugar, butter and zests until it has come together. Cover and let stand for 30 minutes.

Punch down the dough, and knead the mixture to a supple dough (in machine or by hand). If you knead by hand you can knead in the filling immediately. If you knead with the machine, first make a supple dough, then work in the filling by hand, so the raisins/currants won't break up.

Place the dough in a greased bowl, cover and let stand in a warm spot for 45 minutes.

Divide the dough in 12-18 equal pieces, shape into rolls and flatten them a bit. Place on a baking sheet covered with baking parchment, cover with greased plastic and let rise again for 1 - 1,5 hours.

In the meantime preheat the oven to 400°F.

Brush the rolls with the beaten egg and bake them for about 15 minutes (depending on the amount/size you made them) until light golden and done. Let them cool on a wire rack. .

(adapted from "Kleine broodjes van ver & dichtbij"- I. Berentschot)


* if you can't find currants, just alternate golden raisins with red raisins. I soaked my raisins in warm water before adding them to the dough. You may want to adjust your water/flour ratio if you do or don't.

Paashaasjes

Easter is coming! And with that, we get ready to plan the biggest meal of the weekend: Easter breakfast/brunch with the family! Pretty bread rolls and pastries, cold cuts, sweet bread toppings, egg dishes, juices, and loads and loads of coffee and tea, of course. After which the kids go for the egg hunt, and the adults remain at the table, picking at things, talking about (what else) the weather, and having another cup of coffee. Gezellig!

And we don't celebrate Easter once, we celebrate it twice! That's right - when the rest of the world is going back to work on Monday, the Dutch take another day off and celebrate what is known as Tweede Paasdag, Second Easter Day! Many government offices and most stores will continue to be closed that day, but it's a great day for taking a stroll along the beach or in the forest, visiting one of the theme parks that the country is rich, and for finishing up the leftovers of the previous day's lavish breakfast or brunch.

One highlight of the Easter brunch is the variety of breads: croissants, crunchy rolls, sliced loaves that tend to be a bit more luxurious than what usually comes to the table. You'll find a similar bread to the Kerststol, an almond paste filled fruit bread called Paasstol, or a Paasbrood in the stores, and the bakers will have a great selection of Easter-inspired pastries, cookies, bonbons, cakes and more.

Here at the Dutch Table, we've been making our own Paashaasjes, Easter bunnies, for every Easter brunch. These bread bunnies are a great way of combining bread and eggs into one, and they're a great favorite with the kids as well as adults. The dough is savory, not sweet, so combines well with the hard-boiled egg. They come in various shapes: these ones are our own design.

Paashaasjes
4 cups flour (500 gr.)
1 cup warm milk or water (236 ml)
1/2 cup buttermilk (118 ml)
2 teaspoons active dry yeast
1 teaspoon salt
6 small eggs, rinsed and dry
18 dark raisins or currants
1 egg, beaten well

Mix the warm milk or water and buttermilk, sprinkle the yeast on top and let it proof for several minutes. The yeast should start to form bubbles and create foam on the liquid. Add the flour to a bowl or mixer, pour in the yeasty milk and knead for several minutes. Add the salt and continue to knead until the dough comes together into a ball and pulls away from the sides of the bowl. (If you're a heavy scooper, you may need to add a little bit of liquid for it to come together). Knead the dough on the counter for a couple of minutes, then cover and rest it in a greased bowl, at room temperature, and let it rise until double.

Punch down the dough and divide it into six equal parts, rolling each into a ball. Relax the dough for five minutes, covered, then roll into ovals of approximately 6 to 7 inches long with the help of a rolling pin. With a sharp knife or with scissors, make a cut of about two inches length-wise in the top of the dough: those will be the ears. Make a similar cut one inch on each side of the ear at an angle, and then cut back at an angle (see picture above, that's easier than trying to explain it!).

Put three raisins (two for the eyes, one for the nose) where the face is going to be. Stretch both of those arms a bit, put a raw egg in the shell (the egg will be hard-boiled when it comes out of the oven) on its tummy and fold the arms over. Place the bunnies on a baking sheet lined with parchment paper or a silicone baking mat. Cover and let rise in a warm place until puffy. Push the raisins in just a bit so that they'll cook in the dough and not on top, as they may come off. Right before going in the oven, brush the bunnies with the egg wash, and press a toothpick in sideways to mark the whiskers, the ears and the paws.

Bake at 375F (190C) for about 20 minutes or until golden.

This will make six bunnies.


Bananensoes

So here I am, boasting how easy it was to make the Bossche bollen, how yummie they were and did I say how easy it was to make them, when somebody said: you should make those with banana pudding inside!
I'll be darned! We have something called bananensoes in Holland which is similar to a Bossche bol but with, yeah you guessed it, bananas. Check this out!

In this case I didn't add real bananas to the whipped cream because I had no intention to cutting the bol open, quite honestly for fear that the whole thing would collapse. But usually the bananensoes is an elongated éclair-esque pastry, with whipped cream and slices of fresh banana in the middle, topped with a white chocolate glaze colored yellow with food coloring and finished with brown chocolate drizzle (I'm sure there is a technical term for this but it eludes me this second).

Instead of splitting up the dough into two or four, I just made one whopping big soes. Just because.

Bananensoes
1/3 cup of flour
1/3 cup of water
2 tablespoons of butter
1 egg, beaten
pinch of salt

1/2 cup of white chocolate chips
1 tablespoon of water
1 drop of yellow food coloring

1/2 cup of whipping cream
2 tablespoons of sugar
1 tablespoon of banana cream pudding mix

1/4 cup of semi-sweet chocolate chips
1 teaspoon of water

Heat the water and the butter in a saucepan over medium heat. Bring to a boil, then take off the stove. Add the flour and stir until it all comes together in a ball. Throw in the pinch of salt, stir in the egg and continue to stir until the dough has absorbed all the egg and is a homogenous whole.

Line a baking sheet with parchment paper, divide the dough in four (for smaller bollen) or in two (for decent sized ones) and place it on top of the parchment. Bake in an 375F degree oven for about 20-25 minutes or until puffy and golden. Cool on a rack.

In the meantime, beat the whipping cream, the sugar and the banana pudding mix until it's stiff. Fill a pastry bag with small tip and poke through the bottom of the soes. Fill with whipped cream. Heat the chocolate chips and the tablespoon of water in the microwave (30 seconds on medium), stir until the chocolate has melted and the sauce has come together. Let it cool for about 10 minutes, add the food coloring, then carefully take the cream-filled bananensoes and dip, head first, into the chocolate. If you don't want to get your hands dirty, just set the soes on a rack and slowly pour the chocolate over the top, one spoonful at a time. Prepare the dark chocolate sauce the same way and drizzle over the bananensoes.

Cool in the fridge for about 20 minutes or until the chocolate is solid and everything has had a chance to firm up a bit.


Bossche Bollen

Anytime we travel by train in the Netherlands, I always check to see if, by chance, Den Bosch station is on the route. Ever since I found out that the pastry store of Jan de Groot is right outside the station, I try to stop in and have their signature pastry: the Bossche bol. I take my research very seriously! ;-) Their iconic pastries are like chocolate eclairs but bigger, fluffier, rounder, with better chocolate and much more cream. These Bossche beauties have made the city of 's Hertogenbosch famous (or is it the other way around?) and are the number one pastry that is served with a fork and knife* and a handful of napkins. Because there is no way, just like with the tompouce, that you will not end up with whipped cream on your lap, on your tie or blouse, and on your fingers. And that is just the charm of these bollen.

Now, these come together fairly quickly and are not all that hard to make, so give it a try! And if they don't come out looking exactly the same as Jan de Groot's - not to worry. Practice makes perfect - and it's better to have a funny shaped Bossche bol than no Bossche bol. Right? Right!

Bossche Bollen
For the dough:
1/2 cup (125 ml) water
3 tablespoons (50 grams) butter
Pinch of salt
1/2 cup (75 grams) all-purpose flour
2 eggs, beaten

For the filling:
1 cup (250 ml) whipping cream
2 large tablespoons powdered sugar

For the glaze:
1/3 cup (75 ml) whipping cream
1 cup (125 grams) semi-sweet chocolate chips


Heat the water and the butter and a pinch of salt in a saucepan over medium heat. Bring to a boil, then take off the stove. Add the flour and stir until it all comes together in a ball. Let it cool a little bit (just a few minutes), then stir in the eggs a few spoonfuls at a time, and continue to stir until the dough has absorbed all the egg and is a homogenous whole.

Line a baking sheet with parchment paper, divide the dough in four and place it on top of the parchment. Bake in a 375F/190C degree oven for about 20-25 minutes or until puffy and golden. Cool on a rack. As they cool, they will deflate some, but not to worry. 

In the meantime, beat the whipping cream and the sugar until stiff. Fill a pastry bag with a small tip and poke through the bottom of the bol. Cup the pastry, bottom up, in your hand, and fill with whipped cream. It will puff up nicely and give a round shape to the pastry.

Heat the cream on the stove to boiling, then pull it off the heat and stir in the chocolate chips. Let them melt, and stir the whole thing into a sauce. Let it cool for about 10 minutes or until lukewarm, then carefully take the cream-filled Bossche bol and dip, head first, into the chocolate. If you don't want to get your hands dirty, just set the bollen on a rack and slowly pour the chocolate over the top, one spoonful at a time. I have had the best luck with pouring over, for an even coating. 

Cool in the fridge for about 20 minutes or until the chocolate is solid and everything has had a chance to firm up a bit. Enjoy with a nice cup of coffee and some good company. And keep those napkins handy!


And this is what happens when you turn your back for a moment and somebody else is with you in the kitchen.......Needless to say, the Bossche bol is messy enough to easily identify the culprit, although I wasn't sure if the whipped cream on their chin or the cheesy grin on their face gave them away. Both, I guess!

* purists will shudder at the thought of being given a knife and fork! They turn the pastry upside down and just bite into it. 

Tijgerbollen

Tiger rolls, tiger bread, or Dutch crunch are a typical and traditional Dutch bread. When I grew up, it would mostly appear as a luxury bread on weekends, or during special holiday breakfasts or brunches, such as Easter or Christmas. I am not sure why it's called tiger bread, although I assume because it has a rather exotic looking crust, but it could just as well have been called giraffe bread or leopard bread. But tiger bread it is, so that's what we'll call it!  The unique crust is achieved by spreading a rice flour and yeast paste on the bread dough. As the bread rises, the crust splits into separate crunchy little morsels. Eat these rolls warm out of the oven or re-heated: the crust will have a pleasant crunch and the taste will be optimal. For a richer dough, you can use milk instead of water. 

© Maas en Scheldebode 14 June 1901 pg.8

The earliest advertisement that I was able to find stems from 1901, where master baker Wessels from 
Sommelsdijk (Zuid-Holland) announces the availability of "tijgerbrood" daily, but no information whatsoever as to where it came from, who invented it, or how it came about. One source online suggests that it must have come from Asia, seeing as how rice flour was not used in the Netherlands. But Aaltje's cookbook from 1845 includes several recipes with rice, and rice flour, so it wasn't all that uncommon. It was however considered a bread in its own category, as many baking competitions and baker certifications had a separate category for tiger bread. 

Oh well. I will keep digging to see if I can figure it out, but in the meantime, let's bake! 


For the dough
4 cups all-purpose flour (550 gr.)
1 1/2 cup warm water (355 ml)
2 teaspoons active dry yeast (8 gr.)
1 teaspoon kosher salt (8 gr.)
1 teaspoon sugar (6 gr.)
1 tablespoon butter, melted (15 gr.)

For the crust paste
3/4 cup rice flour (100 gr.)
1/2 cup warm water (118 ml)
1 tablespoon active dry yeast (9 gr.)
1 tablespoon sugar (15 gr.)
1 tablespoon vegetable oil (15 gr.)
1/4 teaspoon kosher salt (1 gr.)

For the dough, mix the flour, salt, yeast and sugar. Add the warm water and knead until a soft dough. Add in the tablespoon of melted butter, knead together. Let rise for an hour, or until doubled, punch down and divide into equally sized rolls ( I measure mine out at approx. 3.5 oz/100 grams each)

For the crust, mix flour with water, yeast and the sugar. Stir, then add the salt and the oil. Let sit for about fifteen minutes (get a cup big enough because it will rise extensively!). Brush the rolls with the mixture, applying a layer of paste on the top and sides of the rolls. (You will not use up all the paste, somewhere up to 3/4 of the mixture - just don't spread it on too thick)

Proof the rolls for another ten minutes, then bake in a 375F oven for about 20-22 minutes or until golden brown. Best eaten the same day.


Makes nine rolls.

Saucijzenbroodjes

The fastest way to describe saucijzenbroodjes is to say they're like worstenbroodjes, sausage rolls, but fancier. Instead of bread dough encasing the ground meat sausage, a saucijzenbroodje wraps the meat in a delicate pillow of crisp, flaky puff pastry. The common worst gets bread dough, the saucijs (a fancier name for sausage, from the French saucisse) gets the buttery pastry.

It's the culinary version of a famous Dutch saying: "Er zijn werkpaarden en er zijn luxe paarden"(There are work horses and there are luxury horses). The saucijzenbroodje is definitely a luxury horse!

Saucijzenbroodjes are readily available, warm, at Dutch train stations, in fast food places and often consumed for lunch with a salad or a cup of soup. The puff pastry makes it a fairly rich treat (and a bit messy if you're eating it on the go!) but is also very versatile. This recipe makes a basic, pretty standard flavored roll, but you are welcome to add your favorite spices to the mix. How about shoarma flavors, or a spicy hint of curry? It's your choice!

This is also a great treat to share with friends at a potluck, as a snack for TV watching, or for lunch with a salad.

Saucijzenbroodjes
8 squares of 5 x 5 inches frozen puff pastry
1 lb ground beef
1 tablespoon fresh parsley, minced
1/2 teaspoon onion powder
1/2 teaspoon ground black pepper
Pinch of nutmeg
1 teaspoon salt
1 egg, beaten
2 tablespoons panko or bread crumbs

Lay the puff pastry squares on the counter to defrost. Mix the meat, parsley and the spices together, add half of the beaten egg and all of the breadcrumbs. Mix and roll into a large sausage. Divide it in eight equal parts and roll each one into a log, about 4.5 inches long, a little shorter than the length of the puff pastry square.

Heat the oven to 425 F. Place the sausage on one half of the pastry square, brush a little egg on the edges and fold over the other half. Press the long edge shut with a fork. After you've folded all eight pastry squares, brush the tops with the rest of the beaten egg. Line a baking sheet with parchment paper, put the saucijzenbroodjes on top and bake in the oven for approximately 20 minutes or until golden brown.

Best eaten hot or warm - keep in fridge and consume within 24 hours.


My Amazon selections for this recipe


As an Amazon Associate I earn from qualifying purchases.


De snelste manier om een saucijzenbroodje te beschrijven is door te zeggen dat ze op worstenbroodjes lijken, maar dan sjieker. In plaats van brooddeeg om het worstje van gehakt, omarmt het saucijzenbroodje het vlees in een broos kussen van knapperig, luchtig bladerdeeg. De gewone worst krijgt brooddeeg, de saucijs (een sjiekere naam voor worst, van het Frans saucisse) krijgt het smeuïge korstdeeg.

Het is de culinaire versie van het bekende Nederlandse spreekwoord "Er zijn werkpaarden en er zijn luxe paarden". Het saucijzenbroodje is beslist een luxe paardje!

Saucijzenbroodjes zijn kant-en-klaar verkrijgbaar, warm, op Nederlandse treinstations, in cafetarias en worden vaak gegeten tijdens het middagmaal met een salade of een kopje soep. Het bladerdeeg zorgt ervoor dat het best wel een machtige versnapering is (en kruimelt nogal als je hem uit het vuistje eet!) maar is ook vrij veelzijdig. Dit recept is voor een standaard saucijzenbroodje, maar u kunt er natuurlijk uw eigen draai aan geven. Wat dacht u van shoarma kruiden, of een pittige kerriesmaak? Kiest u maar!

Dit is ook een lekkere traktatie om te delen met vrienden tijdens een gezamenlijk etentje, als een snack tijdens het televisie kijken, of voor het middagmaal met een salade.

Saucijzenbroodjes
8 plakjes bladerdeeg van 12 x 12 cm
500 gram rundergehakt
1 eetlepel verse peterselie, fijngehakt
1/2 theelepel uienpoeder
1/2 theelepel zwarte peper, gemalen
Mespuntje nootmuskaat
1 theelepel zout
1 ei, geklopt
2 eetlepels panko of broodkruimels

Leg de plakjes bladerdeeg op het aanrecht om ze te ontdooien. Meng het vlees met de peterselie en de specerijen, voeg de helft van het ei toe en de volledige broodkruimels. Meng het nogmaals, en rol het dan in een grote worst. Verdeel het in acht gelijke stukken en rol ieder stuk uit tot een stammetje, ongeveer 10 cm, iets korter dan de lengte van het bladerdeeg.

Heat the oven to 225C. Plaats ieder worstje op de ene helft van het plakje bladerdeeg, strijk een beetje ei op de randjes en vouw de andere helft er over heen. Druk de lange kant vast met de tanden van een vork. Nadat u alle acht plakjes bladerdeeg gevouwen heeft, strijk de bovenkant dan in met de rest van het ei. Leg een blaadje bakpapier op een bakplaat, leg de saucijzenbroodjes er op en bak ze in de oven voor ongeveer 20 minuten, of totdat ze mooi goudbruin zijn.

Het lekkerste warm uit de oven of lauw gegeten - bewaar ze anders in de koelkast en gebruik ze binnen een dag.


Nonnevotten

If you're a fan of Carnaval, and if you find yourself in the southern regions of the country in the next week or so, you are in luck! This year, February is the month that the traditionally Catholic parts of the Netherlands celebrate this colorful festival, but the planning for these events already started on November 11 of last year. During these meetings, princes are elected to rule the temporary kingdoms, routes need to be established, floats designed, costumes sewn....it is an unstoppable beehive of activity that involves many members of a community.

All this hard work culminates, during the five days before and after the weekend of February 11th, in a myriad of activities. The party starts on Thursday and ends the morning of Ash Wednesday. In the province of Limburg especially, carnaval is a colorful revelry of non-stop music, dancing, laughter and drinking, five days long. Five days long!!! (If you want to see what carnaval is all about, check out the excellent documentary "Nao Ut Zuuje",about carnaval in the city of Venlo)

As you can imagine, all that physical energy has to be fed and maintained somehow – and in the southeastern part of the province, it's the deep fried nonnevotten that provide that much needed fuel. The combination of grease, sugar, carbs and warmth provide enough energy to keep going, especially when it’s cold outside. And with carnaval being so early this year, it's bound to be a chilly one!

Nonnevotten are pillowy knots of deep fried dough, rolled in sugar, and are traditionally from the city of Sittard, in Limburg. Their name translates as "nuns' bums" but it is unclear where the name comes from. Some claim it's because the pastries are tied into a knot and look like the bows on the aprons of the Franciscan nuns (another name for the pastry is "strik", bow). Others say "vot" comes from "vod", rags, since the Franciscan sisters presumably exchanged fried goods for donated worn clothing that they would pass on to the poor. So far, I haven't been able to find a reliable and conclusive source for its name, but these two sound plausible.

The nonnevotten are made with flour, milk, yeast, and butter, and are rolled in sugar before being served. In the old days, these knots were great for using up the last of the perishable ingredients before Lent kicked in, but they proved to be so popular that they can be found in bakeries year round. Nonnevotten are best eaten warm and fresh straight from the baker’s store. 

Somehow the whole "let's-party-like-it's-going-to-be-Lent-in-five-days" doesn't really work when you live so far away from it all.  I cherish the memories of walking in the carnaval parades with my grandma Pauline, tossing candy to the kids, long days going from village to village dressed up either individually or in a group - it was a lot of fun!

So, although I don't dress up anymore, am not dancing any polonaises anytime soon, or even engage in loud song singing while dressed in a colorful costume, I will honor this traditional festivity by frying nonnevotten. Just because I'm not a part of the carnaval festivities back home, doesn't mean I have to forego all pleasures. Time to whip up a batch of dough and fry up some sugary, doughy goodies! Alaaaffff!!!!!!!!!!!!!!!!!!!!!

Nonnevotten
1/2 cup (125 ml) milk, lukewarm
3 teaspoons (10 gr.) active dry yeast*
1 3/4 cup (250 gr.) flour
5 tablespoons (60 gr.) butter, melted and room temperature
2 tablespoons (20 gr.) sugar

Fryer oil (sunflower, canola, rapeseed....)
Deep fryer or fryer pan for stove top

Sprinkle the yeast over the surface of the lukewarm milk. The larger the surface, the better so that all the single particles can expand in the liquid, and not clump together. Set it aside so that it can proof. This should not take long, a good five minutes, where the yeast will start forming small bubbles.

While you wait for the yeast to proof, mix the flour and sugar together in a bowl and check the oil in your fryer. Make sure it's clean and that you have enough oil.

Pour the warm milk with the yeast in the bowl with the flour, add the melted butter and knead everything together into a scraggly dough. Continue to knead the dough for five or six minutes on the counter top until it's smooth. Roll it into a ball, put it back into the bowl and cover it. Let rest and rise for about 30 to 40 minutes in a warm spot.

After the dough has risen, take it out of the bowl onto the counter, and roll it into a log, with just a few strokes. Divide the dough into six equal parts. Roll each part into a long rope, about 16 inches (about 40 cm) long, place a loose knot in it and set aside until all ropes are done. Some bakers tie one single knot, others wrap the dough ends twice, so take your pick. After you've knotted the dough, cover them loosely with plastic wrap, and let the nonnevotten rest and rise for at least fifteen to twenty minutes, while you heat the oil.

Heat the fryer or a skillet with oil to 350F/180C. Fry two or three nonnevotten at a time until golden-brown, but don't crowd the pan. Stack them on a plate with paper towels to drain some of the fat, and when cooled down, roll in sugar.

Enjoy warm or cold, and have a wonderful, fun and safe Carnaval!


* Or 30 grams fresh yeast.

Ontbijtkoek

It's actually called "breakfast cake", this ontbijtkoek, but Dutch spice bread seems a more appropriate term in English. Favored by young and old, ontbijtkoek is an integral part of the breakfast table in Holland. It also shows up as a quick pick-me-up around four o'clock with a cup of tea, and it performs as the key ingredient for a children's birthday game called "koekhappen", i.e. cake nipping. This is where slices of ontbijtkoek are strung on a piece of wire or string and held above the heads of blindfolded children. Like birds in a nest, they strain their little necks up, mouths open wide, in hope of catching a crumb. The joke for the grownups is of course to lower the cake within reach and then yank it up, so that the kids bite into air instead of a sweet treat. One of the commercials that still has me laughing out loud is this one for a famous ontbijtkoek brand.

Ontbijtkoek, just like that other Dutch favorite, honey cake, is traditionally not baked at home. Not many breads or cakes are any more, unfortunately, and these breakfast beauties are mostly produced commercially. But heck, I wouldn't be Dutch if I didn't at least try, and I am glad to say that the homemade version is close enough, or perhaps even better, than the store-bought version. Go on, have a try! For a gluten-free version, substitute 2 cups (300 grams) of Bob's Red Mill GF flour for the two cups of flour in the recipe.

Ontbijtkoek
1 cup rye flour (150g)
1 cup all purpose flour (150g)
3 teaspoons baking powder
2 teaspoons cinnamon
1/2 teaspoon each cardamom, ginger, coriander, and ground cloves
1/2 cup dark brown sugar (100g)
1/4 cup dark molasses* (80g)
1/2 cup honey (150g)
1 cup milk (235ml)
Pinch of salt

Mix everything together into a smooth batter. Heat the oven to 325F/160C, grease a 9 x 5 inch (23 x 13 cm) rectangular cake pan, pour the batter in, and bake on the middle rack. Check after 45 - 50 minutes to see if the cake is done - a toothpick in the middle should come out clean. If not, bake for another 5 to 10 minutes, or until done.

Cool on a rack, then wrap and store in plastic wrap for that extra sticky outside crust. Eat sliced with a lick of good butter.


*For readers in the UK and Australia, I have not tested this with black treacle. I do know that the Australian molasses apparently does not work for this recipe. 


Tompoes

The tompouce, or tompoes, is a traditional Dutch pastry that is often served with afternoon coffee or at celebratory events like birthdays. It's similar to what's known as a Napoleon here in the United States, Napoleonbakelse in Sweden and Finland, and Napoleon-cake in Norway and Denmark. In Holland and Belgium it is called a tompoes, or tompouce (Tom Thumb). The odd coincidence that both Napoleon (Bonaparte) and Tom Thumb were vertically challenged may not be such a coincidence after all, but I would have to look into that a little further. Other countries, with perhaps less inclination towards fairy tale or historic nomenclature, just call the pastries custard or vanilla slices. What sets the Dutch variety apart is the sickeningly sweet Peptobismol-esque pink icing, often topped with a complimentary white stripe of whipped cream, as if the caloric content from the pastry itself was not enough.


It's a pastry that is much favored by all and, as the national sense of humor dictates, is the traditional choice for being served when one is visiting with one's family inlaws for the first time or when one has to make a good impression of oneself and is now challenged with having to eat a pastry that is going to fall to pieces the moment one bites into one end. Both the tompoes and the Bossche Bol, which I'll bake sometime soon, are the two top pastries that are a devil to eat, either by hand or with cutlery, without making an absolute mess.

But in case you were in a situation where manners do not matter, the easiest way to consume this lovely baked good is to grab the bottom layer firmly between thumb and index and attack it, one bite at a time, short side first.

Tompoes
1 cup of milk
1 vanilla bean (or 1 tablespoon of vanilla flavoring)
2 egg yolks
1/4 cup of sugar
1/4 cup of flour
pinch of salt
1 sheet of puff pastry
1 egg, beaten

Warm the milk, add the vanilla bean and steep for 15 minutes. Mix the egg yolks with the sugar, add the salt and add flour, one tablespoon. Stir until creamy.

Take the vanilla bean out of the milk, open it up and scrape out the seeds (or add the vanilla essence to the milk) and stir. Take one tablespoon of warm milk and stir it into the egg yolk mix, then stir in the rest of the flour. Carefully stir all this back into the warm milk into the pan, put it back on a low heat and stir until it becomes a thick mass. Take off the stove and cover with a piece of plastic, to avoid forming a skin when it cools down.

Heat the oven to 400F. Spray a baking sheet or pan with cooking spray. Cut the puff pastry sheet in 4 equal rectangular sections and place them on the baking sheet. Brush the top with the beaten egg and bake for fifteen minutes, or until the dough has puffed up and is golden brown. Remove from the oven, and taking care not to burn your fingers, quickly and carefully pull the top from the bottom sheet. Set all eight pieces aside on a rack to cool.

For the icing
3 heaping tablespoons of powdered sugar
2 teaspoons of milk
1 drop of red food coloring

Mix the sugar with one teaspoon of milk and the food coloring. Stir until blended, then add the remaining milk to make a quick icing.

Take the bottom part of one of the baked puff pastries and spread the cooled down vanilla cream on it. Top it with its corresponding top half of the pastry. When all four are done, carefully spread the pink icing on top: let it dry and eat!